A Group Block is a Reservation that blocks out designated rooms, setting them aside from your pool of available rooms against the expectation that they will be reserved ("Picked up") by guests associated with a particular Group. A Group Block can encompass as many rooms as you wish, and may also be associated with certain Functions/Events to take place or Packages that have been generated with the Group in mind.
Skyware Systems Create a Group Block command will allow you to make a reservation holding a certain number of rooms, at a particular rate, that are expected to be booked (picked up) by individuals associated with the group. These rooms are then generally held out of your general pool of available rooms, until picked up by group members, or until a pre-determined length of time before the specified date (for example 30 days out).
Typically, a Group Block Rate will be less than your regular Rack Rate (often Rack Rate -10%), and a Group Block Reservation includes elements (such as functions or packages) other than the rooms. These elements will generally have been discussed with your Sales, Catering or Conference Managers before a Group Block is created.
Creating a Group Block is similar to creating a Reservation except that you can select to reserve multiple rooms of one or more types for the Reservation.
Creating a Group Block Reservation uses a Reservation Wizard that looks very similar to your Advanced Reservation Wizard. The Group Block Reservation Wizard is divided into separate screens for Dates, Room Types, Functions, Packages, Rates, Group Account, Payment, Finish and Post. You will progress through this Wizard step-by-step until the Group Block Reservation has been created. Some information is not required to create the Group Block reservation (for example, you may not yet have a Function associated, or you may not yet be posting a deposit or charge to the account) but more information can be added at a subsequent time (please see Modify a Group Block for further details).
Depending on your Property's configuration, you may have the Create a Group Block command available from the Quick Menu.
If not, you can select Create A Group Block from the Reservations Menu.
The Reservations Menu may be reached either directly from the Quick Menu, or by using the Full Menu and selecting Reservations => from the Other section.
Click the Create a Group Block command in the Group Reservation section of the Menu.
Alternately, IF your Property is using Skyware Systems Sales and Catering system, you can also use the Sales and Catering menu, by clicking on the Create a Group Block command in the Groups section of the Menu.
When you use the Create a Group Block command to open the Group Block Wizard, it will open on the first screen, Dates.
The buttons above the form area of the screen indicate what screen you are currently on and what screens are next/previous as you are taken through the wizard. When these buttons are grayed out, they are not active until you go to the next step(s) in the wizard. If they are active, you can click on them at any time to go straight to that area without following the exact steps of the wizard.
Use the buttons at the top of the form section of each screen to move forward and backward through the wizard screens as needed.
This screen is similar to the one seen in the Advanced Reservation Wizard, but it does differ in several ways.
Group Status: This allows you to specify how certain this Group Block Reservation is, for future reference. This is a drop-down menu with the choices Definite, Tentative or Prospect.
DEFINITE takes the rooms out of inventory AND allows for pick up.
TENTATIVE takes the rooms out of inventory, but does not allow for pick up EXCEPT from the group master (the pick up from a group function cannot be used).
PROSPECT does NOT take rooms out of inventory.
Be sure to make your selection carefully. You may need to change this option at a later date.
Arrive: Use the drop-down menus or the calendar icon to specify the expected Arrival Date.
Depart: Use the drop-down menus or the calendar icon to specify the expected Departure date,
OR Nights: You can specify the number of nights the reservation will cover (which will automatically specify the departure date for you).
Rate Plan: This is a drop-down menu of your available options. Be sure to choose a Rate Plan appropriate for a Group Reservation from the available options (your Property may already have a specific one configured). By default, the Rate Plans order is set in the Rate Plans Maintenance screen - it is unlikely that the first one in this order is the correct one to use.
Building: This is a drop-down menu of the buildings configured for your Property. Select the appropriate one.
Package: This is a drop-down menu of your available Package options. You may select one here, or it may be more appropriate for this Group Block to select your packages on the Package screen. Any Package selected here will affect the entire Group Block.
Note: Adding a Package using this field will add the selected package to EVERY NIGHT of the Stay. For example, a dinner package - if the stay is 7 nights, the dinner package will be added to each night (meaning 7 dinner packages).
Note: These options are not REQUIRED for you to move on from this screen, and in fact you will have the opportunity to alter them on a later screen.
Booking Name: Enter the name the Group Block booking will be under. You should complete this field with a name for the Group Block Reservation that is easy to recognize (for example, "the Smith's Reunion") for later modification or Pick ups.
This field is required. You WILL NOT be able to progress further with this reservation until you have entered a Booking Name.
Is this a Wholesaler?: This box may be checked or unchecked. By default it is unchecked.
If this is a wholesale block, check the Wholesaler Block and it will take on the characteristics of a wholesale booking.
Pickup Type: This can be important when guests are attempting to make reservations associated with this Group Block. This is a drop-down menu of three options. You should select the most appropriate one for this Group Block.
NORMAL, which is the default option, and is equivalent to a CLOSED block.
ALLOW OPEN PICKUP OUTSIDE BLOCK, which is an OPEN block, meaning rooms outside those that have been blocked can be picked up in this Group Block; and allows both different rooms and arrival/departure dates, as well as the ability to increase the number of rooms that the block has.
PICKUP OUTSIDE BLOCK WITHIN TOTAL BLOCK, which is also an OPEN block, allows different room types to be selected, but only allows for the same TOTAL number of rooms. For instance, with a 20 room block, only 20 rooms, regardless of type may be selected, and only within the date range for the group.
In most to least restrictive order (in terms of allowing rooms to be picked up),
NORMAL is the most restrictive on your Group Block reservation, then
PICKUP OUTSIDE BLOCK WITHIN TOTAL BLOCK, and
ALLOW OPEN PICKUP OUTSIDE BLOCK is least restrictive.
SM: You can choose to attach the name of a Sales manager (SM). This is a drop-down menu of those available. Choose one or leave blank.
CM: You can choose to attach the name of a Catering manager (CM). This is a drop-down menu of those available. Choose one or leave blank.
CSM: You can choose to attach the name of a Conference Services manager (CSM). This is a drop-down menu of those available. Choose one or leave blank.
It can be useful to attach the name of a manager to the Group Block booking, especially if they were involved in generating the reservation, in case any questions arise.
Attached Company: If you wish to associate a company (in order to pull in Negotiated Rates) which will automatically default the Guest type, Segment and Rate type from the Company, you should complete this field. You can complete the field manually, or clicking on the gray "More Options" button will generate a pop up list of all Companies currently entered into your Skyware Systems with negotiated rates, for you to select one from.
When you are happy with your selections on the Dates screen, you can move on to the next screen in the Wizard, called ROOM TYPES.
Click the orange button Room Types >>.
This will save your entry so far as a TEMP reservation, with the Booking Name you have entered, and open the next screen.
Note: Tabs which are grayed out cannot yet be accessed; this helps move you through the Wizard in the correct order of process. Now you have created a temporary reservation, several of the tabs will be accessible which were not previously.
Here on the Room Types screen, at the top of the screen you can see that the Group Block booking now has a TEMP reservation status, with the Booking Name you have entered.
You can change the Building or the Rate Plan specified on the Dates screen, if you wish. The options selected on the Dates screen will be automatically displayed on this screen, unless you change them now.
Auto Assign Rooms?: This box may be checked or unchecked. By default it is unchecked.
Group Rooms: As you are CREATING the reservation, you will want to use the automatically selected Group Rooms Set Block option. (You will wish to use the other option, Set Remaining, once the reservation has been completed if it requires modification).
The Room Type screen displays in table form all your available Room Types, for the Dates selected, with numbers of each room type currently available each day with the expected rates on that day.
NOTE: A camera icon indicates there is a digital picture of the room available by clicking on the camera icon.
In a GROUP reservation, you will want to have MORE THAN ONE ROOM.
You will enter in the number of rooms of each particular type that you want to attach to this Group Block, and click the gray "Set" button. This will highlight the Room Type row selected in yellow, and put the number into the cell for each day of the Group Block reservation.
Entering a number into the field on the left next to the Room Type will enter this number into ALL dates for the reservation. If the number of rooms changes during the Group Block, you can enter the number of rooms reserved per room type per day.
Note: You can also add rooms of a particular type just by clicking the Room Type button.
Please be aware: Clicking the Room Type button will automatically add ONE PER CLICK to each date of the reservation (so clicking it three times will increase the number of rooms of that type selected by three).
HOWEVER, if the Room Type choice does not have the desired availability on one or all of the reservation days, it will not be highlighted. This helps you verify that you do have the rooms available for the whole time of the Group Block, for the number of people desired.
If you need to choose a different Room Type, simply click the gray "Clear" button to the right of the row, and this will remove the inserted numbers and the highlight. Then you can choose a different Room Type.
Repeat this for as many Room Types/ Number of rooms as you wish to be included on your reservation.
IF you do not have the desired Room Type(s) available, instead of clearing and choosing a different Room Type, you MAY be able to use the orange button "Passcode to Oversell the Room Types".
This however is NOT usually necessary when CREATING a Group Block.
It can be done IF you have upgraded/spare rooms available, to be able to put your guest(s) into if ALL rooms are taken.
This is DEPENDENT on your Property. It is generally not a good idea if you do not have a lot more rooms available than those included in your Group Block Reservation, and is also determined by your authorization.
If you DO use the Oversell button, you will see a pop up window requesting your Passcode or ID to allow you to oversell Room Types. Only once you have completed this, will you be able to select as many rooms of the type as you wish.
Otherwise, as stated, clear your previous selection and select a Room Type that DOES have the required availability.
Once you have selected the rooms that you wish to be included in this Group Block, you may move on to the next screen.
In order, this would be the Functions screen, followed by the Packages screen. The Functions screen is used generally with our Sales and Catering system to attach Function book events to the Group Block. Packages are used when charging a group for items in addition to Room Revenue, as a total amount.
If your Group Block reservation does not have any Functions planned and has not requested any particular Packages, you can skip these screens completely. You can also, if you choose not to assign specific Room numbers yet, can skip the Room numbers screen and move directly on to Check Rates.
Click the orange button with the name of the screen you wish to view next; (Functions, Packages, Assign Room #s or Check Rates).
Functions are events which would not normally occur at your Property, specifically created for the participants of your Group Block to partake in.
A Function may be something as simple as a group breakfast; a formal meal such as a dinner banquet, a conference meeting or a Wedding reception. If you have the space, the possibilities are endless.
You can create and add a Function to a Group Block either during the creation of the Block, or at any point after.
Note: You can still manage any Groups using your regular Skyware Systems software, however once you wish to schedule dedicated spaces or time, you should use our specific Sales and Catering Module to do so. If your Property does not currently have our Sales and Catering Module and are interested in adding it, please contact us at Sales@SkywareSystems.com.
It is assumed that your Skyware system already has the appropriate Function Rooms, Function Rooms Setup Styles and Function Types configured in your Sales and Catering section. If not, you will need to address this before you can use the Function screen to create Functions for your Group Blocks.
These Function events will occur in your various Function Rooms, and are tied to your Function Book.
When opened, the Functions screen will display a list of any already configured Functions assigned to this Group Block on the left, and on the right side the fields you need to complete in order to add or edit a Function. During the creation of the Group Block, the first time you open this screen, there will be no Functions displayed until you have generated and saved the first one.
All required fields for generating a Function are included on the General tab of the Functions screen, which is the tab automatically displayed when reaching the screen.
Select BEO or Create BEO #: You may choose to assign a Banquet Event Order number to your Function. If none have been created yet, there will be none available to select from in the drop-down menu for the Select BEO option.
Function Name: You MUST name your Function. It is suggested that this be as simple as possible, whilst still conveying all needed information.
This field is required.
Status: You may set the status of your Function, choosing between Active or Cancelled.
It is assumed that if you are creating a Function, the status will be active, and this is the default option. However, you CAN change this option to canceled, allowing you subsequently to remove a created Function WITHOUT DELETING it. This would mean that it could be re-instated at a later date if desired.
Function Date/Time section:
It is REQUIRED that you complete the start and end DATE of the Function, with year, month and date,
as well as the start and end TIME of the Function, with hours and minutes, AM or PM.
Span: You may choose between Inclusive or Daily.
Inclusive means that the Function covers the WHOLE time covered in the specified Date span. Daily will include only the hours picked on the Dates span.
This field is required.
OK to move: This check box may be checked or unchecked. If checked, the Function may be moved from the room currently assigned to another, if needed. Do NOT check this box if the Function MUST be held in the assigned room only.
Function Attributes section:
Function Type: This is a drop-down menu of the function Types available, select one.
This field is required.
People: You may enter the estimated number of people attending this Function, if known.
Covers: Number of chargeable covers for this Function. Enter a number if known.
Note: If this Group Block has a package attached to it, the cost (cover) may already be included there - in which case, you do not need to complete this field.
GTD: Number of guaranteed attendees. Enter a number if known.
Set For: Number of people to set up for. Enter a number if known.
Setup Style: This refers to how the furniture in the room is arranged (table positions etc). You will select from the drop-down menu of configured options.
This field is required.
Function Room: You MUST select a space for the Function to be held in. Again, You will select from the drop-down menu of configured options.
This field is required.
Your choice will be dependent on how many people will be attending the Function, the chosen set up and the size of your rooms at your Property.
Setup and Breakdown (in minutes): These fields refer to how long it will take you or your staff to prepare the room for the Function, and how long it will take to return it to its previous condition once the Function is complete.
These figures can be assigned to a particular Setup Style in your Sales and Catering area, in which case the number will be automatically entered when the Setup Style is selected, but you may change them to anything you desire here (including 0).
Menu: Select a menu from the configured choices if a menu is needed for this Function. If not, leave blank.
Forecast Revenue section:
This section is important for REPORTING in your Skyware system, not in the actual set up of the Function.
Food, Beverage, AV, Rent, Setup and Misc all have fields which may be completed with estimates on how much will be charged for each category.
Actual Revenue section:
Rent: This is the charge for the room used for the Function. If it is covered in the Package charge, leave as 0.
For example, if you have a breakfast package the charge will be included there rather than here, with the Function being set up so that you have a space for the package to take place for all your Group member guests together.
Once you have completed the information in the General tab you should click the SAVE button in the tool bar.
This will save the Function that you have just created and display it in the section on the left.
You may click it or any Function on the left to show the details on the right and edit the Function further.
Saving the Function will also attach it to the Group Block.
If you choose to edit the Function further, you can select any of the additional tabs on the Function screen to do so.
These tabs allow you to specify the details of the equipment and contents of the room that may be added for the Function (so are important if known, but not critical in creating the Function), with their relevant charges.
Once again, be sure to SAVE any changes you make to these tabs before leaving the Functions screen.
Click the orange button with the name of the screen you wish to view next (Packages, Assign Room #s or Check Rates).
A Package combines several posting components to be sold to a guest or a Group. When a package is attached to the Group's stay record (Folio), only the full package price is seen, but the revenue is disbursed to the post types of the components that make up the package. A Package Plan posts a flat fee to the folio while the revenue gets internally distributed amongst the Component post types that make up the package. Package components may include anything you wish, based on Posting type. For example, you may choose to add a Package to your Group block which charges a fee per guest for the use of a meeting room (rather than a flat fee for the room in the Functions screen)
The Package screen of the Wizard allows you to attach packages to the group Block. To attach a package to a stay from the reservation screen, select the appropriate package from those listed.
For a Group Block, you may wish to include a CMP (Complete Meeting Package), which includes room revenue, for those guests staying at your Property for the meeting, but you may wish to include a DMP (Daily Meeting Plan) for any NOT staying whilst they attend the meeting - this could include for example lunch and room costs, but not the overnight room cost.
How you set up your Packages, and what they include, is up to you. Here in the Group Reservation Wizard, you can only add already configured custom packages to your Group Block. If the Package you desire is not available you will have to assemble it using the Package Plan command found in the Manager's Commands Menu before it will become available here.
A Package by day occurs only on the specific day entered, as opposed to the entire length of the stay; you can therefore specify which day(s) the Package is applied to, and for how many. It may be the packages are applied differently on different days - for example, you may have the packages 1/2 DMP with or without lunch (PM) for the first day, CMP for the middle days and 1/2 DMP no lunch (AM) for the last day of the Group Block reservation.
Enter the desired numbers into the fields for your specified dates for each relevant package, either manually or by using the up and down arrows.
Once you have entered your Package information, click the orange button Save Packages found at the bottom of the Packages screen, before moving on to your next screen.
This screen displays all of the room numbers that match the Room Types selected in the previous screen, and is where you will select the specific room numbers for your reservation.
Note: This screen will ONLY be available here if you have specified in your Property configuration that you wish ALL Group Bookings to be done by Room Number, not (just) Room Type. This is set in your Property's Definitions area; you will need to set "Allow Group Room #" to yes.
Best practice for larger properties is not to pre-select rooms, this means that guest rooms would be assigned after the rooms have been picked up, either by batch pick-up or by the individual guests. Rooms could be assigned at any time after pick-up either in the batch process or at time of check in, allowing you to assign a guest a room which is best fit for them (for example, they may have special requests such as near the elevator, or a high floor, or indicate they may wish to extend their stay.)
The screen will show the previously selected Arrival and Departure dates, which may be changed here if desired.
Filter on Location: This is a drop-down menu of all location options available. Select one if desired, otherwise leave it on the default option -ALL-.
Locations are literally physical placement of the rooms. For example, some rooms may have a garden view, or be near your elevator.
Filter on Features: This is a drop-down menu of all feature options available. Select one if desired, otherwise leave it on the default option -ALL-.
Features are options that a room may have or contain, for example a fireplace, or a microwave. A feature is an option NOT found in every room.
Building and Room Type options are displayed but grayed out; these show what has been specified so far, but cannot be altered here. To change these options you will have to return to a previous screen.
Rate Plan: This again shows the previously selected Rate Plan, but may be altered as desired here.
Show only selected Room Types: 'NSDD', 'NSK', 'NSQ'. This box may be checked or unchecked. by default it is checked. If checked, the screen will ONLY show rooms of the previously selected Room Types.
Rack Order or Best Order: one of these two options will be selected. By default it is Rack Order. Rack Order is the order your Property chose to have the rooms displayed in, which is not necessarily numerical order, it may be room type order instead. Often room types are not grouped together in location.
Best Order is the most efficient use of rooms when rooms are being pre-assigned. This means the number of nights required in the reservation uses the closest match with number of nights available.
To select a Room Number for all days of the stay, click on the gray Room Number button in the left or right columns. Otherwise, click on the room number for each day to select it for that day individually. Selected rooms will be shown in yellow.
Clicking again will remove the selection and release that room.
Note: Even if this screen is present in your Group Block Wizard you do NOT have to complete it to progress with your booking.
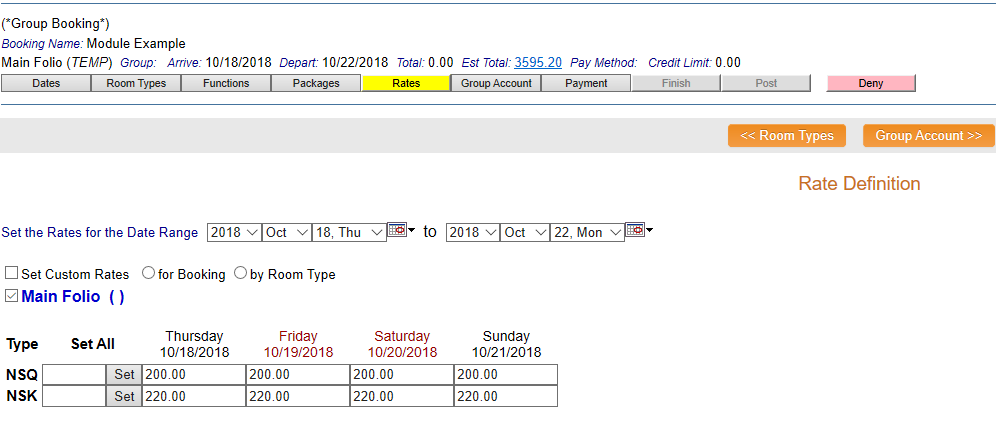
The next screen is your Rates screen. Click the orange button Go to Rates >>.
Move on to the Rates screen either by clicking the orange button Check Rates >>, or by clicking on the Rates tab in the screens list.
IF you have already chosen a particular rate Plan that is appropriate for your Group Block from your list of those available on either the Dates or Room Types screen, you can leave this screen as is. Often, Properties have a Group Block Rate set as one of the available rates. Yours may be one of these.
However, if you do not, and you have a specially negotiated rate for this Group, you can add it here.
Set the Rates for the Date Range: The Date range specified here will be as previously selected, and will be displayed in the grid below. You can change it here if desired.
If the Rate is different between nights, the rate can also be set per night, per Room Type, using the grid
Set Custom Rates: For Booking or For Room Type: You may select the option Set Custom Rates which will allow you to set rates for Single, Double, Triple, or Quad occupancy in your rooms, either by booking or by Room Type.
For each Date/Room Type you can manually enter it into the individual boxes to change the rate amount for that night, for that room.
Entering it into the box next to the Room Type and then clicking "Set" will set the rate for that Room Type for ALL the nights included in the Group Block.
You WILL need to set the rate for EACH Room Type SEPARATELY here. The rates do NOT have to be the same for each Room Type.
This will create your Room Rates for THESE Room Types on THESE dates for THIS Group ONLY.
Once you are happy with the rates that will be charged for the rooms you have in your Group Block you may move on to the next screen, the Group Account screen, by clicking the orange button Group Account >>.
Note: This screen is equivalent to the Guest account screen in the regular Reservation Wizard.
When selecting the Group for this stay, you can search for and select the Group from all of the groups that have been entered into your system, or you can create a new Group record. See Searching for Guests/Groups for more details.
It is recommended if you are not sure if a Group is in your system to search for them first. You want to avoid creating multiple guest records for the same person or Group.
If a group has stayed with your Property previously, use the Previous Group search section (top) to find them. You can search by Company, Phone Number, Guest ID, City or State.
If you are not sure, you may always click << Press to Search >> and check the entire list of previous Groups. If Skyware Systems finds the appropriate Group, click the Select button to the left of the name.
Selecting a Group Account will AUTOMATICALLY populate the Group Block reservation with the required fields and any additional information on record, AND OPEN the PAYMENT screen.
If you subsequently RETURN to this Group Account screen, you will see the selected Group Account displayed in the Previous Group section. You can move on again by clicking the entry itself, or by clicking the Payment >> button.
If you do NOT have the Group Account Information, you will need to complete at minimum the required (red) fields in the New Group section.
If this is a NEW Group, you will need to complete any required fields in the New Group section of the Group Account screen.(in the lower part) of this screen.
Fields with a name highlighted in red are required.
Skyware Systems will always require the Company (this may be a Family name) and Guest Type to be completed. Segment (and/or Origin) may also be required.
Most fields in the New Group information section are self-explanatory, such as Company name or the Address fields.
Required fields vary between Properties, and you should check what your Property requires.
Any additional information you have (such as address, phone number or email) for the Group Reservation should be added here; you may also click on the orange button "Advanced Profile" to enter further information there.
Guest Type: This is a drop-down menu of available options. Here for a Group account you should choose Group or your Property's equivalent. Guest types can also be linked to Segments types at the segment level's "Parent guest type" field. For example the Guest Type "Group" could be used with the Segment Type "Wedding".
Segment: This is a drop-down menu of available options. Choose one.
This is a property-defined list that can be used for marketing and reporting purposes. Segment types and origins are used with Guest Types to further define your guests. Individual guest types lead to different segment types.
Origin: This is a drop-down menu of available options. You may choose one or leave this blank.
Origins are marketing codes that are located on both the group and individual level that can work together to define your guests and provide you with a meaningful marketing analysis for your property. These may include how a customer found the property, how they booked, or where the guests are coming from.
An Origin code refers to where the business came from (Advertising, Repeat Business, Sales Team, etc). Origin codes are very property specific.
VIP: This is a drop-down menu of available options. You may choose one or leave this blank. Guests marked as VIPs will be noted as such on Arrivals, Departures and Housekeeping Reports. They are generally used with returning guests.
A guest can be marked as a VIP with the ability to select different types/levels of VIPs when entering a reservation.
These selections available are configured in the Property and System Configuration area of Skyware. See Property and System Configuration Overview for more details. These categories can enable you to track Groups for purposes such as marketing.
Advanced Profile: This orange button can be clicked to take you to a new screen where even more information about the Group can be entered.
Once you have entered the information, you can move on to the Payment screen.
Note: If you enter information into the NEW GROUP section of this page, you will need to click the orange button Payment >> or the Payment tab button to move on. There is no Save button, it will occur automatically when you go to the next screen.
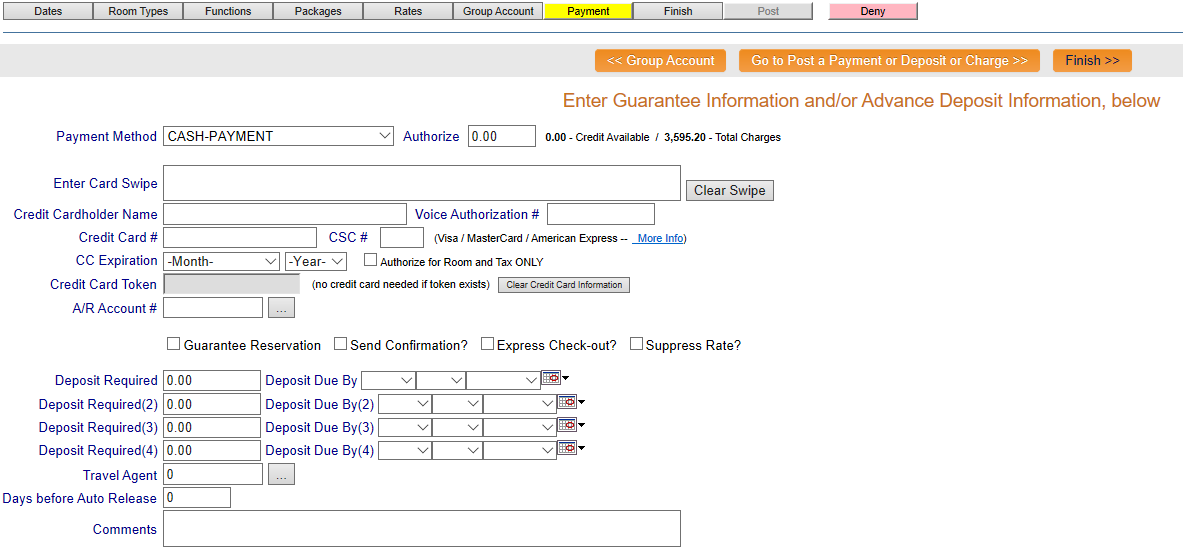
Often, when taking a Group Reservation to block a set of your rooms, you will want to take a deposit (to guarantee the hold of the rooms out of general availability). This screen allows you to enter how the Group account will be paying for their charges and enter a deposit request if required that will trace (remind you) that a deposit is due for this Group. Note: This does NOT process a payment, but rather stores payment information for future use.
If NOT, you can move on immediately by clicking the orange Finish >> button or the Finish tab, which will take you to the Main Folio page for the Group booking.
If taking a deposit, you will need to fill in the appropriate fields on the Payment screen.
If a deposit is required, you should complete the Deposit Required fields, with the amounts and Dates appropriate. (You can enter multiple deposit requirements, with dates closer and closer to the actual reservation dates).
This will allow you to print a report of deposits by due date.
You will be able to check on the Main Folio screen if a deposit is required, and by when.
Again, you can now click Finish >> to move on.
Payment Method: This is a drop-down menu of the payment methods that have been configured for your system. If you do not see the option you need available, you will need to configure it. See Property and System Configuration Overview for more details. Select one.
If selecting a credit card, and you do not have a number in the token field, you can click the "Click Here to Enter Credit Card Information" button to open a new screen to your gateway provider (Shift 4, Tenerum or USAePay) and manually enter the credit card information to receive the token. Alternatively click the "Finish Using PinPad" button to activate your PinPad/EMV device and open a new screen to your gateway provider (Shift 4, Tenerum or USAePay) and receive the token. See Using Pin Pads/EMV Devices for further details.
Note: If your Group Account has a Credit Card associated with it already that is NOT the desired payment option in this case, you should click the "Clear Credit Card Information" button before inputting a new card to prevent the card on file being charged.
Authorize for Room and Tax only: This box may be checked or unchecked. By default it is unchecked. If checked, the payment method here will only be charged for room and tax, and a different option is needed for any incidentals (for example room service or parking). For example, the Group (company) may be paying the room tariff and tax, but the individual guest themselves is responsible for any further charges.
A/R Account #: Accounts/Receivable. This is a direct billing account. This may also sometimes be called a City ledger (C/L). Use this if the stay is being billed directly to a Company. If using one, enter the number in the field or the search icon may be used to open up a pop-up window containing all the available Accounts and allow you to select the appropriate one.
Guarantee Reservation: This box may be checked or unchecked. By default it is unchecked until a credit card is added to the stay. If it is checked, this means that the reservation payments must be made even if the guest fails to arrive. Exact terms of a guaranteed reservation vary between properties.
Send Confirmation?: This box may be checked or unchecked. By default it is unchecked. If it is checked, this means you will trigger a confirmation to be printed from the Night Audit Print Confirmations function.
Express Check-out?: This box may be checked or unchecked. By default it is unchecked. If it is checked, this means the guests in the group are allowed to check out of your Property without having to return to the Front Desk. The credit card used at check-in is billed for charges or purchases during your stay.
Suppress Rate?: This box may be checked or unchecked. By default it is unchecked. If it is checked, this means Skyware Systems will hide the rate amount on printed guest documents, so they will be hidden from the individual guests.
Here in the Group Block reservation, you may require multiple deposits (up to 4), due at different Dates.
Deposit Required (1, 2, 3 or 4): If a deposit is required for this reservation (for example, an amount equivalent to one night stay), enter it into this field. The default value is 0.00.
Deposit Due By (1, 2, 3 or 4): If you have entered a value in the deposit required field, you can specify the date this deposit is required by, by selecting from the drop-down menu options for the date or the calender display.
Travel Agent #: Used for commissions, for example AAA Travel and American Express Travel. If used, Skyware will generate a commission amount based on the commission settings in the account. This can be a percentage or a dollar amount. The default option is not attached to anything, with an ID # of 0 (none). If using one, enter the number in the field or the search icon may be used to open up a pop-up window containing all the available Accounts and allow you to select the appropriate one.
Days before Auto-Release: This option is the number of days before the current Arrival Date of the Group Block reservation that any rooms (that are part of the Group Block) that have not yet been picked up will be released back into general availability. The number of days is determined by you and your Property, and can be changed any time you wish. Enter the number of days prior to the group's arrival date that the rooms should be released. When the date changes through the night audit to the "release date" the system will automatically release any rooms not picked up.
Comments: This box may contain anything you want. This box is set up NOT to print on anything during Skyware’s initial configuration, however you should check with your property’s procedures.
If you have received a PAYMENT/GUARANTEE here you will need to click the orange button Go to Post a Payment or Deposit or Charge.
This will take you to Posting Screen & Statement screen.
If you need to post a Deposit payment made towards the Group Block reservation, you will need to enter the information into the Posting Information section of the Posting Screen & Statement screen.
The Posting Screen and Statement screen allows you to view all of the charges and/or credits that have been posted to the Group's account, and post new charges and/or credits.
Department: If it is not already selected, be sure to select "Deposit" from the drop-down menu of options in the Department field.
Type: Select the type of deposit from those listed in the Posting Type drop-down menu, depending on how you received the payment (cash, check etc).
Amount: Type in the amount deposited in the Amount field.
Now click the orange button Post Amount.
The screen will give you the "Successful Post!" message, and the posted amount will now be visible in the Statement section of the screen.
Once you are finished on the Posting Screen and Statement screen, you can now click the orange button Finish >> or the Finish tab.
Once you have clicked Finish, the reservation is considered complete, and the Main Folio screen for this Group reservation will be opened.
It will be called Group Booking for BOOKING NAME (Main Folio), the booking name being the one that you entered into the field on the Dates screen when you began making the Group Block reservation, and will have a RESV status applied to the Folio.
Once you have navigated through the screens of the Wizard, you will have made your Group Block reservation, with a RESV status.
This is the END of the procedure for CREATING the Group Block reservation.
Any alterations you make to the Group Block will now be considered MODIFICATIONS. Please see Modify a Group Block for further information.
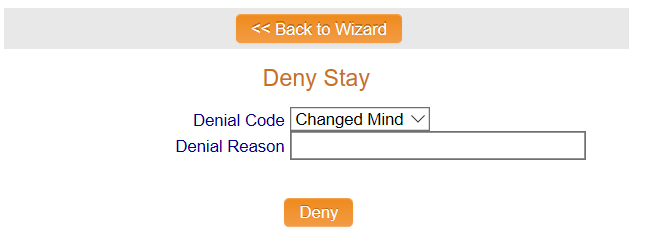
Note: At any point If you do not wish to take the reservation, or if they decide not to book at your Property you can enter it in as Denied Business by clicking on the pink Deny button in the upper right of the Wizard.
At any point If you do not wish to take the reservation, or if they decide not to book at your property you can enter it in as Denied Business PRIOR to clicking Finish by clicking on the pink "Deny" button in the upper right.
If a potential Group Block decides that they do NOT want a reservation, clicking the pink "Deny" button in the top bar will release the room(s) back into inventory. A new Deny Stay screen will be displayed, where you will pick a code from those available in the drop-down menu and can type in anything you would like into the Denial Reason box. Denial codes are used to track business that does not materialize, whether you do not take the reservation or the guest does not want to stay at your property. Some examples of denial reasons might be: Rate too high, did not like the location, guest has bad credit.
This selection is part of the Property and System Configuration area of Skyware. You can alter these or add others for your property in the Property and System Configuration area. See Property and System Configuration Overview for more details.
Date Updated June 10, 2021